TL;DR
Pultruded FRP stair nosings are designed to be trimmed and installed in the field without special fabrication equipment. Use a diamond or stone blade (not a coarse wood blade), wear proper PPE for fiberglass dust, and always dry-fit before applying adhesive. The quality of the finished install depends more on substrate preparation, correct fastener choice, and cure time than on the cut itself.
What Does It Mean to Cut and Fit Pultruded FRP Stair Nosings on Site?
Cutting and fitting pultruded FRP stair nosings on site is the field process of trimming fiberglass-reinforced polymer nosing profiles to the exact stair width, checking each profile against the existing tread edge, drilling and cleaning as required, bonding or mechanically fixing the nosing, and confirming the finished stair edge sits flat, secure, visible, and slip-resistant before reopening to traffic.
“Pultruded” refers to the manufacturing process: continuous glass fiber reinforcement is pulled through resin and formed into a consistent cross-section. This creates a lightweight, corrosion-resistant profile that arrives in standard lengths and can be trimmed to fit without welding or special fabrication. FRP and GRP (glass-reinforced plastic) mean the same thing. Canadian and American sources typically say FRP, while UK and Australian guides tend to say GRP.
The reason this matters beyond convenience is safety. In Canada, about 12% of all accepted workplace injury claims come from slips, trips, and falls, roughly 34,000 annually according to CCOHS data based on AWCBC Injury Statistics Across Canada 2023 source. Stairs and high-traffic areas are among the highest-risk zones. A well-fitted anti-slip nosing reduces traction risk, but a poorly fitted one can introduce a new trip hazard: a raised edge, a rocking profile, or a nosing that lifts under foot traffic.
That is why “fit” means more than just “cut to length.” It covers three things:
- Length fit — trimmed to stair width.
- Contact fit — the underside sits flat and fully supported on the tread.
- Safety fit — the finished edge is secure, visible, and not proud or loose.
If you are looking at FRP stair tread nosings for a retrofit project, the sections below walk through every step from tool selection to final inspection.
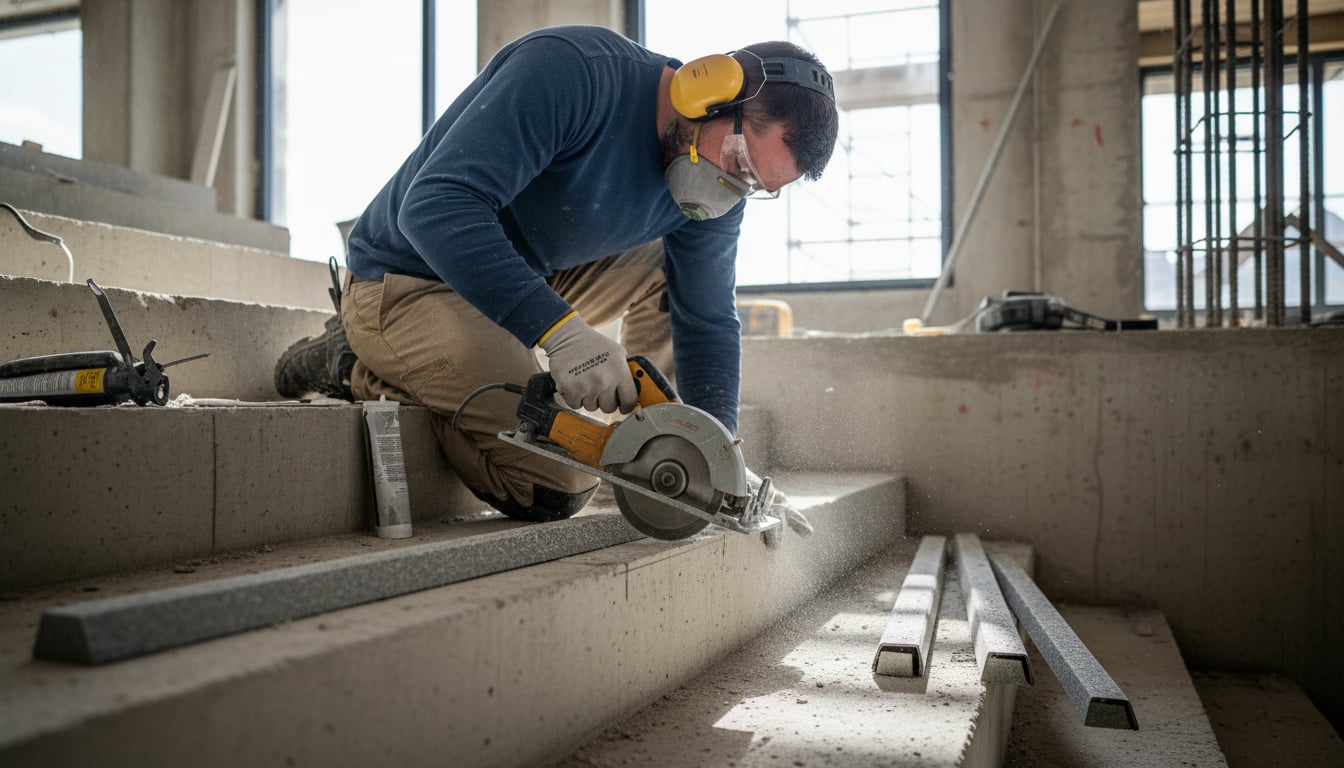
Tools and PPE for Cutting FRP Stair Nosings
Choosing the Right Blade
This is where most online guides create confusion, because they mix up stair nosing guidance with FRP grating guidance. The two are different products with different cutting rules.
For narrow pultruded stair nosing profiles, installation guides commonly recommend:
- A dry-cut diamond blade on a 100 mm handheld angle grinder source
- Orbital cutting equipment with a stone or diamond blade source
- A hacksaw or jigsaw for minor adjustments and small cut-outs source
For larger FRP grating panels, the rules change. Strongwell’s grating installation guide warns that grinders should never be used on FRP/GRP grating, recommending circular saws with gritted or diamond blades for straight cuts and jigsaws for penetrations instead source. Grating has bearing bars, crossrods, and structural spans that make overcutting or unsupported cuts risky in ways that don’t apply to a narrow nosing profile.
If you work with both stair nosings and anti-slip fiberglass FRP grating, keep the tool guidance separate in your head. Follow the nosing manufacturer’s instructions for the specific product you are installing.
Here is a quick reference:
| Tool | Best for | Watch out for |
|---|---|---|
| Diamond blade angle grinder | Fast trimming of narrow FRP stair nosing profiles | Creates dust and chips; needs firm support and full PPE |
| Circular saw with diamond/gritted blade | Long straight cuts on larger FRP panels | Use a straight edge guide; not always needed for short nosing cuts |
| Jigsaw with suitable blade | Notches, curves, small cut-outs, controlled adjustments | Support the piece well to avoid chatter and chipping |
| Hacksaw | Minor manual trimming, small jobs | Slower; edge may need dressing afterward |
| Regular wood blade or coarse-tooth blade | Avoid unless the manufacturer says otherwise | Dulls quickly on FRP and can produce rough, splintered cuts source |
Practitioners on LinkedIn confirm the value of diamond-coated tools. Fiberline Building Profiles posted that GRP profiles are light and easy to adjust on site with no welding required, and recommended diamond-coated tools specifically for smoother, cleaner cuts source.
PPE Is Not Optional
Cutting, drilling, sanding, or grinding FRP generates fiberglass and resin dust. This dust irritates skin, eyes, and the upper respiratory system source. It is not just a nuisance; it is a real health concern that experienced installers take seriously.
Required PPE for cutting FRP stair nosings on site:
- Safety glasses or goggles
- Dust mask or respirator (not a thin paper mask)
- Gloves
- Long sleeves or protective clothing (Canadian Composite Structures recommends a shop coat with neck and sleeves taped to prevent skin irritation) source
- Hearing protection when using power tools
Cut outdoors or with extraction when possible. Multiple installation guides specifically require cutting to be carried out externally or in a well-ventilated area with dust extraction source. Clean all dust off the nosing and stair before bonding so it does not contaminate the adhesive.
Practitioners on Reddit echo this. In an r/Construction thread about FRP, installers discussed the dust and mess of field work, emphasizing the importance of setting up a workable cutting station with cleanup supplies nearby source. Composite and electrical subreddits consistently prioritize dust control, vacuum filtration, and respirators when cutting fiberglass materials source.
How to Cut Pultruded FRP Stair Nosing to Length
Step 1: Measure Each Tread Individually
Do not assume every tread in a flight is the same width. Walls bow, stringers shift, and old buildings settle unevenly. Measure at the front edge where the nosing will sit, and write the measurement directly on each piece.
Step 2: Mark the Cut Line and Allow for Kerf
Mark clearly with a pencil or fine marker. Account for the width of material the blade removes (the kerf). Canadian Composite Structures gives 3/16 inch as a kerf allowance guide for its FRP products source. A small error here adds up across a flight of stairs.
If chipping is a concern, apply masking tape along both sides of the cut line. Beginner fiberglass cutting guides recommend this to help reduce edge splintering source. Some installers also cut from the less visible underside where the profile allows it, since any minor chipping is hidden.
Step 3: Support and Clamp the Nosing
Support the nosing firmly on sawhorses or a workbench. An unsupported profile will vibrate and chatter, producing rough cuts and risking breakage. Machining forum discussions consistently note that fiberglass is abrasive and heat-sensitive, and forcing the blade rather than letting it cut at its own pace produces ragged results source.
Step 4: Cut Slowly
Let the blade do the work. Saw slower than you would for wood source. Excessive pressure dulls tools, and excessive heat can soften the bonding resin, producing rough, delaminated cuts. Strongwell’s fabrication manual confirms that too much force is a common cause of poor FRP cuts source.
Step 5: Dress and Inspect the Edge
Deburr any rough spots with a file or light sanding. The cut edge should be smooth enough that it will not catch skin or clothing.
Step 6: Seal the Cut Edge (If Required)
This is where guidance varies, and it confuses a lot of people.
Some FRP stair-nosing manufacturers state that no edge sealing is required after cutting source. Meanwhile, many FRP grating manufacturers recommend sealing all cut edges with polyurethane or epoxy to protect exposed glass fibers from moisture or chemical intrusion source. GRP Australia’s team posted on LinkedIn that they recommend sealing all cut edges to extend material lifespan source.
The practical rule: follow the manufacturer’s instructions for the specific nosing you are installing. Be more cautious in wet, marine, or chemically aggressive environments. Do not assume grating guidance automatically applies to a pultruded stair nosing profile, or vice versa.
Dry-Fit First: The Step Most Installers Should Not Skip
Before any adhesive leaves the tube, place the cut nosing on the tread and check everything.
- Length — Does it fit between the walls or stringers without forcing or leaving visible gaps?
- Contact — Does the underside sit flat on the tread surface, or does it rock?
- Front edge — Is it aligned with the stair edge and sitting tight to the riser where the profile requires it?
- Back edge — Is the trailing edge flush with the tread, or is it proud enough to catch a toe?
Blue Diamond’s installation guide advises dry-fitting before adhesive to ensure a suitable fit source. This is not a suggestion. It is the point where you catch problems that adhesive cannot fix.
Pre-Drill Before Bonding
If you plan to use mechanical fasteners alongside adhesive (which is the recommended approach for most commercial installs), drill all holes through the nosing during the dry-fit stage. Blue Diamond is specific on why: holes must be pre-drilled before adhesive is applied so drilling dust does not contaminate the bonding surface source.
Barsec recommends drilling from the smooth rear face through to the anti-slip top face source. For hole spacing, American Stair Treads suggests keeping holes at least 2 inches from any edge, with 12 to 16 inch spacing in high-traffic areas source.
After drilling, vacuum or brush away all dust from the nosing and the stair surface. Then you are ready for adhesive.
Multiple Reddit flooring threads raise the issue of proud or raised stair-nosing edges becoming trip hazards. Commenters consistently point back to product compatibility, substrate height, and installation quality as the real causes source. Dry-fitting catches these problems before they are permanent.
Adhesive, Screws, Bolts, Rivets, or Both?
Double Fixing Is the Safer Default
“Double fixing” means adhesive plus mechanical fasteners. Many stair-nosing guides recommend this approach for commercial and high-traffic installations. National Stair Nosings recommends double fixing using high-strength construction adhesive (such as Sikaflex or similar) combined with mechanical fixings at both ends source.
Adhesive beds the nosing to the tread, fills minor gaps, and prevents bounce and chatter. Mechanical fasteners resist lift, lateral movement, and the stresses of heavy foot traffic.
Adhesive-only installation is sometimes acceptable, but it depends on whether the substrate is clean, dry, flat, and strong enough to bond reliably. Blue Diamond states that mechanical fixing is necessary if the substrate is contaminated by oil or particles, or if surface strength is insufficient source. This is a substrate-quality decision, not an aesthetic preference.
Adhesive Quantity and Type
Use the adhesive type recommended by the nosing manufacturer. Urethane and polyurethane construction adhesives are common choices. For bead size, a 6 mm bead from a 300 ml tube covers approximately 5 linear metres of stair nosing, or roughly 60 ml per metre source. Barsec specifies 6 to 8 mm beads of urethane mastic for its nosing installations source.
Cure Time Is Not a Suggestion
This is a frequently missed step. One stair-nosing guide says to allow 6 to 8 hours before traffic source. Blue Diamond says optimum bonding is around 48 hours at 23°C, though light foot traffic may be possible after a few hours depending on temperature source. Loctite PL Premium’s technical data gives 24 to 48 hours at 25°C and 50% relative humidity, with cold temperatures and low humidity significantly increasing cure time source.
In Canadian outdoor or unheated settings, cure time can stretch well beyond the adhesive label’s stated time. Do not assume a stair is ready for traffic because the adhesive has skinned over or grabbed. Use barricades, signage, or scheduling so the stairs stay closed until the adhesive has actually cured.
One Reddit user in a flooring thread reported that the only failed stair-nosing install across many stair sets was attributed to new-construction traffic walking on the stairs immediately after installation source. Cure time is part of the install, not an afterthought.
Fitting FRP Stair Nosings to Concrete, Timber, Steel, and Grating
The substrate determines the fastener. Here is a summary of common approaches drawn from multiple installation guides:
| Substrate | Typical Fixing Approach | Practical Notes |
|---|---|---|
| Concrete / masonry | Urethane mastic adhesive plus masonry anchors or concrete screws | Clean the surface, remove dust from drilled holes, and use adhesive to bed the nosing and prevent chatter source. Concrete screw length should be slightly longer than plug length for a solid fixing. |
| Timber | Self-tapping screws (e.g., 8g x 35 mm) plus adhesive bed | Screws provide mechanical hold; adhesive stops chatter and bridges minor surface irregularities. |
| Flat steel / tread plate | Adhesive-only or adhesive plus M6 machine screws with nyloc nuts (if underside access exists) or 4.8 mm Monel rivets (if no underside access) | Whether you can reach the underside of the steel changes your fastener options entirely source. |
| Open grating / grille | Stainless steel saddle assemblies with M6 bolts and nyloc nuts, or grating clips | Nosings on open grating require clamp-style assemblies that grip the grating bars. Stainless steel saddle clamp assemblies are a common accessory for this type of installation. |
| Weak, contaminated, or uneven substrate | Mechanical fixing is necessary | If the surface has oil, loose paint, crumbling concrete, or insufficient strength, adhesive alone will fail. Fix the substrate first source. |
Remember that FRP stair nosings are not weight-bearing structural elements. The substrate beneath must be structurally sound because the nosing is an overlay, not a repair source. Worn areas, cracks, holes, and depressions should be repaired before installation.
Common Mistakes When Cutting and Fitting FRP Stair Nosings
Cutting with the wrong blade. Regular wood blades dull almost immediately on FRP and produce rough, splintered edges. Use diamond, stone, or the manufacturer-specified blade.
Forcing the saw. Excessive pressure overheats the resin and dulls tools faster. Let the blade cut at its own pace.
Ignoring kerf allowance. Even 3/16 inch matters when the nosing has to fit between walls or stringers. Measure twice, account for the blade width.
Bonding to a dirty surface. Dust, oil, rust, paint flakes, and moisture all prevent adhesive from gripping. Every installation guide emphasizes clean, dry, sound surfaces.
Applying adhesive before drilling. Drilling after adhesive is down throws dust into the bond line and ruins it. Drill during dry-fit. Clean. Then bond.
Adhesive-only on a bad substrate. If the surface is oily, weak, or contaminated, adhesive alone will not hold. Use mechanical fasteners.
Reopening stairs too soon. Adhesive needs time to cure, and that time depends on the product, temperature, and humidity. Barricade the stairs.
Leaving a proud back edge. If the trailing edge of the nosing sits higher than the tread surface, it becomes a trip hazard. CCOHS identifies uneven walking surfaces and unexpected steps as common trip causes source. The whole point of installing an anti-slip nosing is to make the stair safer, not to add a new hazard.
Stop and Fix the Substrate If:
- The nosing rocks before adhesive
- The stair edge is rounded or broken, leaving a void under the nosing
- The underside does not contact the tread
- Oil, grease, or dust cannot be removed
- Fasteners would land in broken concrete or unsupported grating
- The finished back edge would sit proud enough to catch a foot
Final Checks Before Reopening the Stairs
After the nosing is fastened and the adhesive is applied, run through this checklist before allowing traffic:
- Nosing is fully seated and tight to the stair edge
- No rocking, bounce, or chatter under foot pressure
- No raised back edge or sharp proud transition
- Fasteners are seated but not overtightened (overtightening can crack FRP)
- Adhesive squeeze-out is cleaned before it cures
- Cut ends are smooth and sealed if the manufacturer requires it
- Dust is removed from the tread and surrounding area
- Stair remains closed or controlled until the adhesive cure time is met
- Colour-contrast strip remains visible across the full tread width
That last point matters for accessibility. CSA B651-18 specifies that stair nosings in accessible design should include a colour-contrasted horizontal strip of 50 ± 10 mm depth extending the full width of the tread source. The standard also limits nosing projection to no more than 38 mm and leading-edge radius to no more than 13 mm. While local building codes and project specifications ultimately govern your install, CSA B651 is useful reference context for sizing, visibility, and accessibility.
If your project also involves slip hazards on platforms, ramps, or walkways beyond the stair edges, anti-slip sheets for platforms, ramps, and walkways address those broader areas.
Choosing the Right FRP Stair Nosing for Your Project
Pultruded FRP stair nosings are available in multiple widths, lengths, and colours. Safety Step Canada’s FRP stair tread nosings come in sizes including 70 mm x 900 mm up to 150 mm x 1800 mm, in colours like yellow, black, and black with yellow nose, with optional glow strips for egress visibility. The pultruded construction resists rust and corrosion, avoids delamination, and is lightweight enough to handle and cut on site without heavy equipment.
For projects where aluminum is a better fit (outdoor stairs with specific aesthetic requirements, for example), aluminum stair nosings offer weather-resistant durability and a clean appearance.
Need help choosing sizes, colours, or fixing accessories for your project? Contact Safety Step Canada for guidance.
Frequently Asked Questions
Can pultruded FRP stair nosings be cut on site?
Yes. Multiple FRP and GRP stair-nosing installation guides describe on-site cutting with diamond or stone blades, hacksaws, or jigsaws depending on the product and cut type. The installer needs dust control, PPE, firm support, and the blade recommended by the manufacturer.
What blade should I use to cut FRP stair nosing?
Use the blade your nosing manufacturer recommends. Common options include dry-cut diamond blades, stone blades on an angle grinder, and suitable jigsaw or hacksaw blades for smaller adjustments. Avoid aggressive, coarse-tooth blades. They dull quickly on FRP and can damage the profile or produce rough edges source.
Do I need to seal the cut edge of an FRP stair nosing?
It depends on the product. Some stair-nosing manufacturers state no edge sealing is required after cutting. Many FRP grating manufacturers recommend sealing cut edges with polyurethane or epoxy to protect exposed glass fibers, especially in corrosive or wet environments. Always follow the instructions for the specific nosing profile you are installing.
Is adhesive enough to hold FRP stair nosings?
Sometimes, but many guides recommend double fixing (adhesive plus mechanical fasteners) for commercial and high-traffic installs. Adhesive-only fixing depends on whether the substrate is clean, dry, flat, and structurally strong enough. If the surface is contaminated, weak, or uneven, mechanical fixing is necessary.
How soon can stairs be used after fitting FRP nosings?
Follow the adhesive and nosing manufacturer’s cure-time instructions. One guide says 6 to 8 hours before traffic, another says optimum bonding takes around 48 hours at 23°C, and polyurethane adhesive datasheets show 24 to 48 hours at 25°C with cure slowed by cold temperatures and low humidity. In unheated Canadian settings, expect longer cure times than the label suggests.
What causes FRP nosings to fail after installation?
Common causes include bonding to dusty, oily, or damp surfaces; weak or uneven substrate; skipping the dry-fit; applying adhesive before drilling; insufficient fastener spacing; overtightening screws; insufficient cure time before traffic; and leaving a raised or unsupported edge. Nearly every failure traces back to preparation or process, not to the nosing material itself.
Can I use the same cutting method for FRP grating and FRP stair nosings?
Not necessarily. Narrow pultruded stair nosing profiles and structural FRP grating panels have different cutting rules. Some grating manufacturers prohibit angle grinders entirely, while stair-nosing guides commonly allow them with diamond blades. Always follow product-specific guidance rather than assuming one rule covers all FRP products.
What is double fixing for stair nosings?
Double fixing means using adhesive and mechanical fasteners together. The adhesive beds the nosing to the tread, fills minor surface gaps, and prevents bounce. The mechanical fasteners (screws, bolts, rivets, or saddle clamps depending on substrate) resist lift and lateral movement. It is the most reliable method for high-traffic, commercial, or industrial stairs.