TL;DR
Installing FRP stair nosing on concrete steps requires clean, level surfaces, the right concrete anchors, a polyurethane adhesive, and a hammer drill with masonry bits. The recommended approach combines both mechanical fasteners and adhesive (called “dual fixing”) for maximum durability. Pre-drill through the FRP and into the concrete with the correct diameter masonry bit, apply adhesive in a serpentine pattern, then screw the nosing into place. Allow proper cure time before foot traffic.
Concrete steps crack, erode, and get slippery. Rain, ice, oil, or simple wear can turn a stairway into a hazard. In Canada alone, the Canadian Institute for Health Information reported 162,222 unintentional slip-and-fall injuries in 2020-2021, representing nearly 60% of all injury hospitalizations that year. FRP stair nosing is one of the most effective retrofits to protect both the step edge and the people walking on it.
This guide walks through every stage of the installation process, from understanding the terminology to securing the last screw. Whether you are a facility manager, contractor, or homeowner, you will find concrete-specific instructions, tool lists, adhesive comparisons, and the common mistakes that cause nosings to fail.
Browse FRP stair tread nosings to see available sizes and colors before starting your project.
Key Terms You Need to Know
Before picking up a drill, it helps to understand the materials and methods involved. These terms appear on product labels, spec sheets, and throughout this guide.
FRP (Fiber-Reinforced Polymer)
FRP is a composite material made from a polymer matrix reinforced with fibers, usually glass. The result is a product that is strong, lightweight (roughly one-third the weight of steel), and resistant to corrosion. In North America, “FRP” is the standard industry term. You will sometimes see it written as “Fiber-Reinforced Plastic,” and both mean the same thing.
GRP (Glass-Reinforced Plastic)
GRP is the term used in the UK, Australia, and parts of Europe for the same material. If you are reading an installation guide from a British or Australian manufacturer, “GRP” and “FRP” are interchangeable. In practice, both refer to glass-fiber composites used for stair nosings, grating, and structural profiles.
Pultruded / Pultrusion
Pultrusion is a specific manufacturing process where reinforcing fibers are saturated in resin, pulled through heated dies, and hardened into a continuous profile. Pultruded FRP nosings have a higher strength-to-weight ratio than molded alternatives because the fibers run continuously along the length of the profile. This matters for stair nosings because the edges of steps take repeated impact from foot traffic, and pultruded profiles resist cracking and delamination far better than cheaper molded ones.
Stair Nosing
A stair nosing (also called step nosing) is a protective profile that fits over the front edge of a step. It serves two purposes: increasing traction to prevent slips, and improving visibility so people can clearly see each step edge. Most FRP nosings feature a grit surface bonded to the top for grip and come in high-contrast colors like yellow or yellow-on-black.
Concrete Anchors / Impact Anchors
For concrete substrates, the recommended fastener is typically a No. 8 x 30mm zinc-plated or stainless steel impact anchor. Tapcon-style concrete screws are a popular alternative. These self-tapping screws cut threads directly into a pre-drilled hole in masonry, eliminating the need for plastic plugs or expansion shields.
Mastic Adhesive
A polyurethane or polyester-based construction adhesive used to bond FRP to the substrate. Mastic can tolerate minor surface imperfections in concrete, and a thick bead helps prevent rocking on uneven surfaces. One 10 oz tube of mastic typically covers around 39 feet of FRP safety edge.
Dual Fixing (Belt-and-Braces Method)
The recommended installation approach that combines adhesive and mechanical fasteners. If the adhesive weakens over time, the screws hold the nosing in place. If a screw loosens, the adhesive maintains the bond. Unless a manufacturer specifically says to skip screws, dual fixing is the industry standard for concrete steps.
Why FRP Nosing Is Ideal for Concrete Steps
Concrete steps are tough, but they are not immune to damage. Freeze-thaw cycles in Canadian winters cause surface spalling. Heavy foot traffic wears away the step edge, the most critical area for traction. FRP stair nosing addresses both problems at once: it protects the concrete from further erosion and provides a high-grip surface exactly where feet land.
Compared to aluminum stair nosings, FRP is lighter, easier to cut on site, and will never corrode. It does not require painting, coating, or polishing to maintain its appearance and performance. For industrial and commercial settings where maintenance budgets are tight, this translates to real savings over the life of the product.
The safety case is equally compelling. Over 42,000 Canadian workers are injured annually from falls, accounting for roughly 18% of all lost-time compensation claims across the country. Non-slip stair nosing on the leading edge of each step is one of the simplest interventions to reduce that risk.
Tools and Materials You’ll Need
Gather everything before you start. Running to the hardware store mid-install, with adhesive already curing, is a recipe for a bad day.
Tools:
- Hammer drill (rotary hammer for larger jobs)
- 1/4" (6mm) masonry drill bit (initial pilot holes)
- 5/16" (8mm) masonry drill bit (final anchor holes)
- Standard twist drill bit for FRP (wood/metal type works fine)
- Jigsaw with tungsten carbide blade, angle grinder with abrasive disc, or hacksaw
- Caulk gun
- Tape measure
- Pencil, chalk line, or marker
- Spirit level
- Shop rags
Materials:
- FRP stair nosing profiles (measured and ordered to size)
- Polyurethane construction adhesive (PL Premium, Liquid Nails Heavy Duty, or manufacturer-recommended mastic)
- No. 8 x 30mm stainless steel impact anchors or Tapcon concrete screws
- Cement filler or patching compound (if steps need repair)
- Industrial cleaner or degreaser
PPE (Personal Protective Equipment):
- Safety glasses
- Dust mask or respirator (FRP dust is an irritant)
- Work gloves
- Ear protection (when using power tools)
- Protective clothing (long sleeves recommended when cutting FRP)
If you also need saddle clamp assemblies for grating installations or other mounting hardware, order those at the same time so everything arrives together.
Step-by-Step: How to Install FRP Stair Nosing on Concrete Steps
Step 1: Inspect and Repair the Surface
Start by examining each concrete step closely. Fill any cracks, chips, or holes with cement filler and allow it to cure fully. If the nose of the step is rounded or bowed, build it up with patching compound so the nosing can sit flat. A level surface is essential for both adhesive contact and a secure mechanical fix.
Once repairs are cured, clean the surface with an industrial cleaner or degreaser. Remove any soap residue and let the concrete dry completely. Mastic adhesive can tolerate minor imperfections, but it will not bond reliably to a dirty, wet, or crumbling surface.
Badly damaged concrete should be repaired before installing any fiberglass products. This is not optional. If the substrate is unsound, no amount of adhesive or screws will keep the nosing in place long-term.
Step 2: Measure and Dry-Fit
Measure each step carefully. Check and re-check before cutting. Even a small measurement error can ruin the look and compromise the fit. Place the nosing on the step edge without adhesive to confirm it sits flat, aligns with the step edge, and is the correct length. FRP nosing should fit as closely to the exact width of the step as possible.
This dry-fit stage also reveals any remaining high spots or debris underneath. Mark the position lightly with a pencil so you can place it back precisely after applying adhesive.
Step 3: Cut to Size (If Needed)
If your nosing needs trimming, cut it outside or in a well-ventilated area. FRP dust is an irritant, so wear your dust mask and safety glasses.
A jigsaw with a tungsten carbide blade works best. An angle grinder with an abrasive disc or a hacksaw will also do the job, though cutting FRP by hand is slow and tiring. For detailed guidance on cutting techniques, read this walkthrough on how to cut and fit pultruded FRP nosings.
Drilling through FRP is straightforward using a standard twist drill bit designed for wood or metal. Countersinking is not required because the grit surface conceals the screw heads.
Step 4: Mark and Pre-Drill the Concrete
Position the nosing on the step and mark your fixing locations through the FRP and onto the concrete below. The general rule is approximately 8 fixings per meter (about 3 feet 3 inches) of nosing. Another common guideline is to place screws about 6 inches from each end, then every 12 to 16 inches in between. High-traffic areas warrant tighter spacing.
With the nosing positioned, drill through the grit surface and into the concrete with a 1/4" (6mm) masonry bit. Then remove the nosing, switch to a 5/16" (8mm) masonry bit, and re-drill the concrete holes to the final anchor diameter.
Getting this pre-drill diameter right is critical. Practitioners on contractor forums consistently point to incorrect pre-drilling as the number one cause of Tapcon failures in concrete. If the hole is too small, the screw will snap or strip. Too large, and it will never grip. Follow the anchor manufacturer’s specs exactly.
Step 5: Apply Adhesive
Turn the nosing upside down. Apply a 1/2" bead of polyurethane adhesive around the perimeter, about 1 to 2 inches from the edge (front, back, and sides). Then fill the interior with a zigzag or serpentine pattern. Do not apply adhesive over the pre-drilled holes, as it will interfere with the anchors.
A thick bead of mastic also helps prevent “rocking” on slightly uneven concrete. The adhesive fills micro-gaps between the nosing and the substrate, creating full contact and eliminating the hollow clicking sound that can occur with screws alone. One experienced installer on ContractorTalk noted that PL Premium has held up for years on their own stairs, though they cautioned that it expands during curing. This expansion is less of a concern with FRP since the screws compress the nosing tightly against the step.
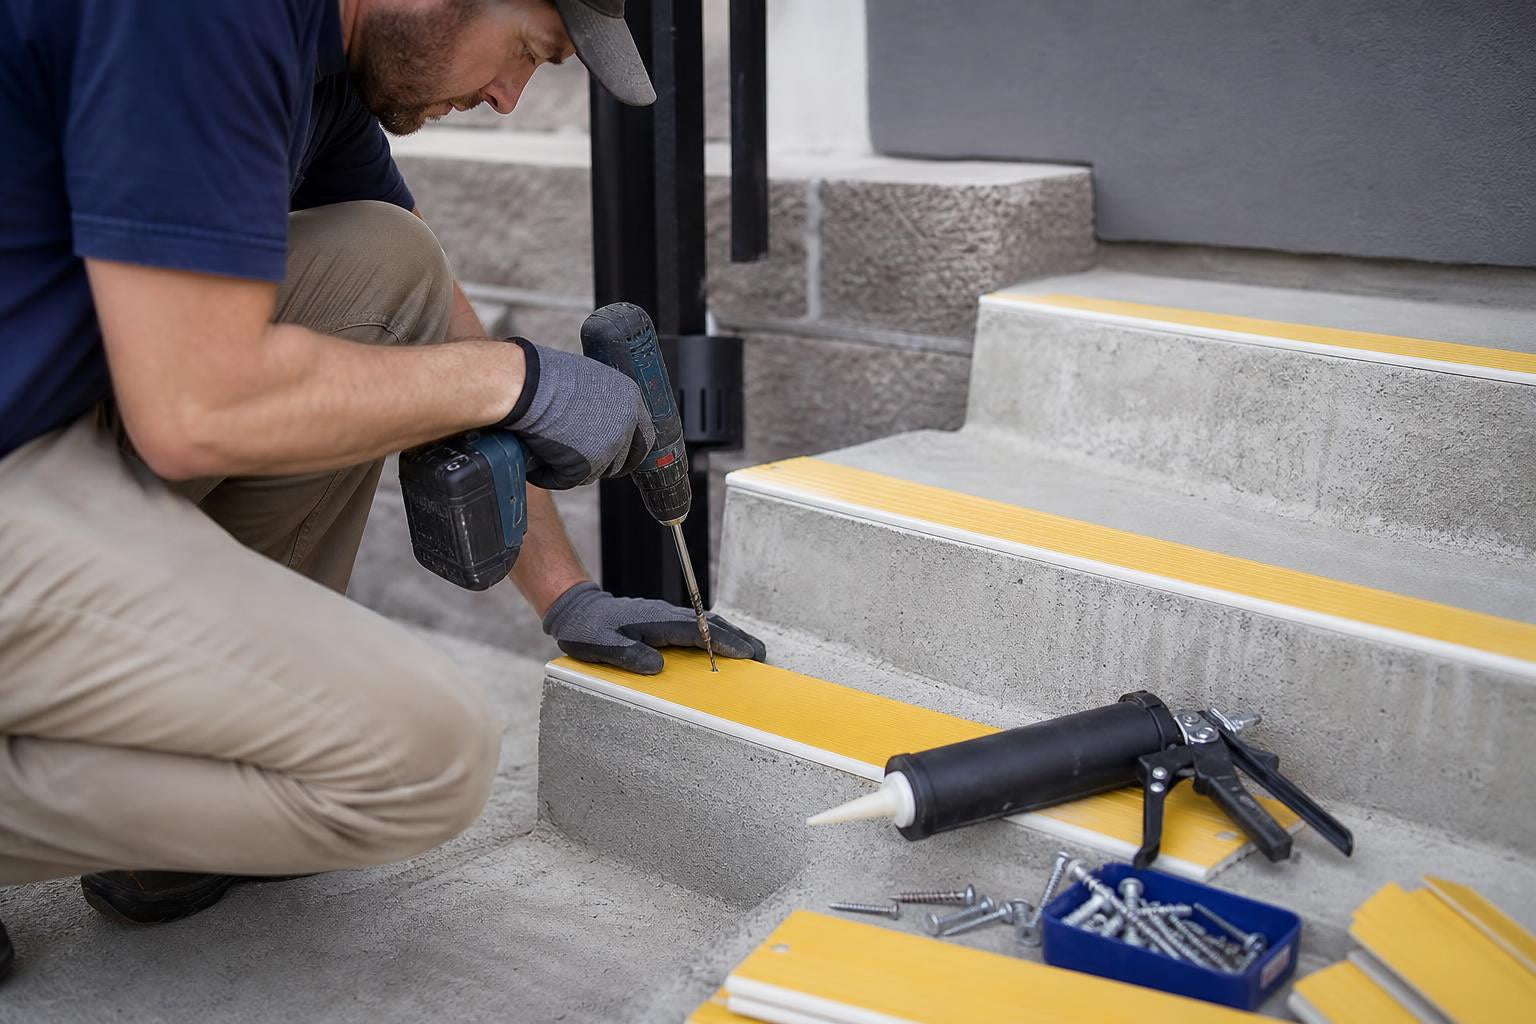
Step 6: Position and Secure
Flip the nosing back over and align it with the pencil marks from your dry fit. Press it firmly onto the concrete. Use a spirit level to confirm the nosing is straight and level before driving any fasteners.
Insert the impact anchors or Tapcon screws and drive them home. Be careful not to over-tighten. Excessive torque can crack the FRP or strip the concrete anchor hole. You want the nosing snug against the step, not crushed.
Step 7: Cure Time and Clean-Up
Immediately wipe away any adhesive that squeezed out from the edges. This is much easier while the adhesive is still wet. After it cures, removal becomes a messy scraping job.
For dual-fixed installations (adhesive plus screws), light foot traffic is generally safe after 1 to 2 hours on non-absorbent surfaces like concrete. If you used adhesive only, without mechanical fasteners, allow 6 to 8 hours of cure time before anyone walks on the steps. Always check the specific adhesive manufacturer’s recommendations, as cure times vary by brand and temperature.
Fixing Methods Compared: Adhesive, Screws, or Both?
No single ranking page for “how to install FRP stair nosing on concrete steps” presents a clear comparison of fixing methods. Here is the breakdown.
| Method | Best For | Pros | Cons |
|---|---|---|---|
| Adhesive only | Indoor, low-traffic, decorative applications | No visible fasteners, no drilling required | Requires clean/dry/warm surface; long cure time (6-8 hrs); weaker in extreme weather |
| Screws only | Cold-weather installs where adhesive won’t cure; temporary installations | Fast, works in any temperature | Can loosen over time; may cause clicking if micro-gaps exist; no backup if screw fails |
| Dual fixing (recommended) | Outdoor concrete, high-traffic, commercial, Canadian climate | Redundant hold; adhesive fills gaps and dampens noise; screws provide immediate grip | Slightly more labor and material cost |
For anyone installing FRP nosing on outdoor concrete steps in Canada, dual fixing is the clear choice. Cold temperatures slow adhesive curing, and freeze-thaw cycles stress any single attachment method. The combination of screws and adhesive gives you immediate hold plus long-term bond strength.
When choosing an adhesive, a urethane or polyurethane-based product is recommended for concrete. Loctite PL Premium and Liquid Nails Heavy Duty are the two most frequently cited options among practitioners. If the concrete surface is damp or the temperature is below the adhesive’s minimum, install with screws first and apply adhesive when conditions improve.
Common Installation Mistakes to Avoid
Most guides on installing FRP stair nosing on concrete skip this section entirely. That is a disservice, because small errors cause real failures.
1. Skipping surface preparation. This is the most frequent mistake. Dust, oil, loose concrete, or moisture will prevent adhesive from bonding. Poor prep leads to premature failure, and a loose nosing becomes a trip hazard rather than a safety feature.
2. Using the wrong adhesive. Not all construction adhesives bond well to FRP or concrete. Silicone-based sealants, for example, are too flexible and lack the shear strength needed for a step edge under constant foot traffic. Stick with polyurethane-based products unless the nosing manufacturer specifies otherwise.
3. Wrong masonry bit diameter. As noted above, this is the leading cause of concrete screw failure. If you are using Tapcon screws, use the exact bit size printed on the Tapcon packaging. Guessing costs you stripped holes and wasted anchors.
4. Over-tightening screws. FRP is tough but not indestructible. Cranking down too hard can crack the profile around the fixing point or strip the hole in the concrete. Tighten until the nosing is flat and firm against the step, then stop.
5. Allowing traffic too soon. Walking on adhesive-only installations before the mastic has cured will break the bond before it forms. For dual-fixed installs, give it at least an hour. For adhesive-only, wait 6 to 8 hours minimum.
6. Cutting FRP indoors without ventilation. FRP dust irritates skin, eyes, and lungs. Always cut outdoors or in a well-ventilated space, and wear a dust mask and safety glasses. Dust residue can be disposed of through normal waste methods, but breathing it in is not something you want to experience.
Post-Installation Inspection and Maintenance
FRP stair nosing is low-maintenance by design. It does not need painting, re-coating, or polishing. But “low maintenance” does not mean “no maintenance.”
Check the security of fixings and adhesive bonds on a regular schedule. In high-traffic commercial or industrial settings, monthly inspections are advised. For residential installations, an annual check is sufficient. Look for any nosings that have shifted, screws that feel loose, or edges that lift when pressed. Catching a small issue early prevents it from becoming a trip hazard.
Clean the grit surface periodically with a stiff brush and mild detergent to maintain traction. Built-up grime, paint, or ice-melt residue can reduce the slip resistance over time. For more general product details and care information, visit our frequently asked questions page.
Frequently Asked Questions
Can I glue FRP nosing to concrete without screws?
You can, but only in indoor, low-traffic, climate-controlled environments where the concrete is clean, dry, and above 10°C (50°F). The adhesive needs ideal conditions to cure properly. For outdoor concrete or commercial settings, always use dual fixing (adhesive plus screws). The mechanical fasteners provide immediate hold while the adhesive cures and serve as a backup if the bond ever weakens.
What size concrete anchors do I need for FRP stair nosing?
The standard recommendation is No. 8 x 30mm stainless steel impact anchors or equivalent Tapcon-style concrete screws. Use a 5/16" (8mm) masonry bit for the final anchor hole. Stainless steel is worth the small premium, especially outdoors, because it will not rust and stain the nosing or concrete.
Can I install FRP nosing in cold weather?
Yes, with the right approach. Screws work in any temperature. Adhesive, however, has minimum temperature requirements that vary by brand (typically above 5°C or 40°F). In cold weather, install the nosing with screws first, then apply adhesive during a warmer period if needed. If the surface is icy or wet, let it dry and warm up before applying any mastic.
How long before I can walk on newly installed nosing?
For dual-fixed installations (screws plus adhesive), allow at least 1 to 2 hours for light foot traffic. For adhesive-only installations on non-absorbent surfaces like concrete, wait a minimum of 6 to 8 hours. Heavy traffic or rolling loads should wait at least 24 hours regardless of the method.
Do I need to countersink screws in FRP?
No. The grit surface of FRP stair nosing conceals the screw heads, and countersinking is not required. A standard flat-head or pan-head concrete screw sits flush enough with the textured surface that it will not create a trip point or wear differently under foot traffic.
How many screws do I need per nosing?
Approximately 8 fixings per meter (3 feet 3 inches) is the standard guideline. Place screws about 6 inches from each end, then space additional fasteners every 12 to 16 inches along the length. In high-traffic areas, tighter spacing of 12 inches on center is recommended.
What if my concrete steps are badly damaged?
Repair the concrete first. Fill cracks and holes with cement patching compound and let it cure before installing nosing. If the step nose is rounded, build it up so the nosing sits flat. Mastic adhesive can tolerate minor imperfections, but it cannot bridge large gaps or hold against a crumbling substrate. You can see examples of real installations on various substrates on our completed projects page.
Properly installed FRP stair nosing turns a worn, slippery concrete stairway into a safe, visible, and durable surface that lasts for years with minimal upkeep. The keys are solid surface prep, correct pre-drilling, dual fixing with the right adhesive, and patience during cure time.
If you have questions about sizing, color options, or installation specifics for your project, contact our team for guidance. For a broader understanding of nosing types, materials, and Canadian code considerations, the stair nosing buyer’s guide covers everything from pricing to building regulations.