TL;DR
Cutting FRP stair nosing on site requires a 4 to 5 inch angle grinder with a diamond dry-cut disc (the top recommendation across manufacturers), plus basic measurement tools, clamps, masking tape, and full PPE including an N95 respirator. Fiberglass dust is a serious skin and lung irritant, so cut outdoors and clean up thoroughly. No edge sealing is needed after cutting pultruded FRP nosings, and standard HSS drill bits handle the fixing holes.
This guide is for contractors, facility maintenance teams, and property managers who need to cut FRP stair nosings to length on a job site. Whether you are retrofitting concrete steps in a commercial building or trimming nosings for a set of industrial stairs, the question is the same: what tools do I actually need, and what blade should I use?
The good news is that cutting FRP stair nosing on site does not require specialty fabrication equipment. Standard power tools handle the job. The bad news is that fiberglass dust is genuinely hazardous, and most installation guides bury that detail in a footnote. This article puts tools, blades, safety, and technique in one place.
Browse FRP stair nosings to see available sizes, colors, and glow-in-the-dark options before planning your cuts.
What Is FRP Stair Nosing?
FRP stands for Fiberglass Reinforced Polymer (sometimes called Fiberglass Reinforced Plastic). FRP stair nosings are L-shaped profiles that bolt or adhere to the leading edge of a stair tread to provide high-traction, slip-resistant protection.
The type used for stair nosings is pultruded, meaning continuous glass fibers are pulled through a heated die filled with resin. This process matters for cutting because:
- The resin fully encapsulates the glass fibers throughout the cross-section.
- No edge sealing is required after you make a cut. The exposed edge is already resin-saturated.
- The material is lightweight and easy to handle on site, but highly abrasive to blades.
Compared to aluminum stair nosings, FRP is lighter, more corrosion-resistant, and simpler to trim in the field, though both materials can be cut on site with the right setup.
Why FRP Nosings Can Be Cut on Site
Pultruded FRP stair nosings are specifically designed for field trimming. Manufacturer installation guides consistently state that the material is “very easily shaped or cut to length” using common power tools. This is a genuine advantage over materials that demand factory cutting or CNC fabrication.
For contractors and maintenance crews, this means you can order standard lengths and trim to fit during installation. No waiting on custom orders. No return trips to the shop. Just measure, mark, clamp, and cut.
That said, the tools you choose and the blade you mount make a significant difference in cut quality, speed, and safety. Fiberglass is extremely abrasive. Practitioners on sailing and woodworking forums consistently report that “GRP blunts most tools very quickly,” so using the wrong blade means ragged edges, burned discs, and wasted time.
Complete Tool Checklist for Cutting FRP Stair Nosing on Site
Here is every tool needed for cutting FRP stair nosing on site, organized by task. Print this list before heading to the job.
Cutting Tools
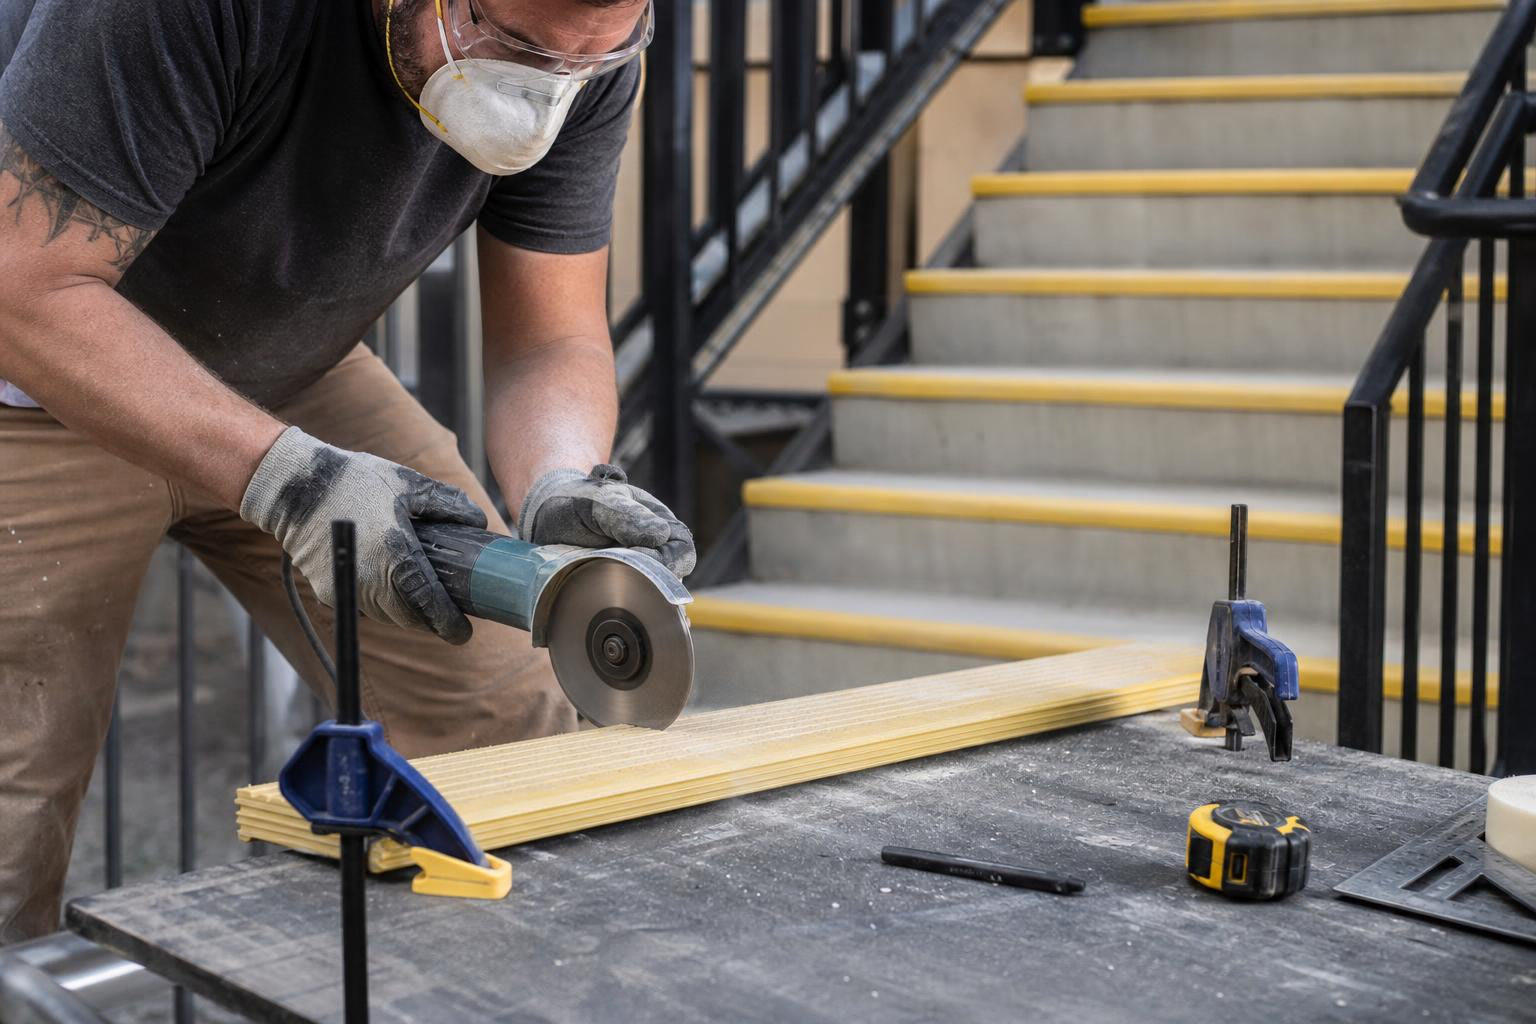
- Angle grinder (4 to 5 inch / 100 to 125mm): The universal first choice. Fast, portable, and effective on the L-shaped nosing profile.
- Circular saw (skill saw): Better for longer straight cuts when you can clamp a straight edge guide.
- Jigsaw: For radius cuts, internal cuts, or fine trimming around obstructions.
- Hacksaw: Works in a pinch for a single cut, but FRP is tough to cut by hand. One manufacturer notes that “if power tools are not readily available, please ask about our cut to size service.”
Blades (See Comparison Table Below)
- Diamond dry-cut disc (for angle grinder)
- 1mm metal cutting disc (for angle grinder, budget alternative)
- Carbide-tipped fine-tooth circular blade (for skill saw)
- Tungsten carbide or diamond-coated jigsaw blade, 24+ TPI
Measurement and Marking
- Tape measure
- Pencil or marker (mark on the smooth underside, not the grit surface)
- Straight edge or speed square (cutting guide)
- Clamps (to secure nosing to a bench, sawhorse, or step)
- Masking tape (apply along the cut line)
Drilling Tools
- Power drill or impact driver
- HSS twist drill bits (standard wood/metal bits work fine)
- Carbide-tipped drill bits (preferred for volume work)
- Hole saws for openings larger than 12mm
Edge Finishing
- Angle grinder with a coarse grit resin fibre disc
- Metal file (for light touch-ups)
PPE (Non-Negotiable)
- N95 or P3 respirator/dust mask
- Sealed safety goggles (not open safety glasses)
- Thick work gloves
- Long sleeves and long pants
- Hearing protection (when using angle grinder or circular saw)
Cleanup
- Shop vacuum (ideally positioned near the cut line during cutting)
- Broom
- Pressure washer (for thorough post-job cleanup)
Blade Selection Guide: Diamond vs. Carbide vs. Metal Disc
This is where most guides fall short. Choosing the right blade is the single biggest factor in cut quality when cutting FRP stair nosing on site. Here is a direct comparison.
| Blade Type | Tool | Best For | Lifespan on FRP | Notes |
|---|---|---|---|---|
| Diamond dry-cut disc | Angle grinder | Clean, precise cuts on nosing profiles | Longest | Most recommended across manufacturer guides. The go-to choice. |
| 1mm metal cutting disc | Angle grinder | Fast rough cuts | Shortest | Burns out faster than diamond. A forum user on the Festool Owners Group recommended using “a very thin kerf continuous diamond disk on a grinder” specifically because metal discs wear quickly on composites. |
| Carbide-tipped circular blade | Circular saw | Long straight cuts with a clamped guide | Good | Fine tooth count preferred. Works well but less maneuverable than a grinder on L-shaped profiles. |
| Tungsten carbide jigsaw blade | Jigsaw | Trimming, notches, radius cuts | Moderate | Recommended by multiple nosing manufacturers for final fitting. |
| Diamond-coated jigsaw blade (24+ TPI) | Jigsaw | Internal cuts, tight curves | Good | Minimum 24 teeth per inch for a clean edge. |
Bottom line: Diamond dry-cut disc on a 4 to 5 inch angle grinder is the standard. If you only buy one blade for the job, make it a diamond disc. Standard wood or steel blades will dull almost immediately and produce rough, splintered cuts.
How to Cut FRP Stair Nosing on Site: Step by Step
1. Measure the Step
Measure the full width of the stair tread. Subtract approximately 50mm (2 inches) from the total length to allow clearance for wall returns, weld beads, or other obstructions at the edges of the step. This clearance rule comes directly from manufacturer installation specs and prevents the nosing from binding or sitting unevenly.
2. Dry Fit Before Cutting
Place the nosing on the step without any fixings. Confirm that it sits flat, that the overhang is correct, and that no obstructions interfere. Multiple manufacturer guides emphasize this step: “dry fit stair nosings to ensure they fit freely and that they sit flat down on the surface.” Skipping the dry fit is the most common reason for re-cuts and wasted material.
For more detail on the full installation process, see the FRP nosing installation guide for concrete steps.
3. Mark the Cut Line
Flip the nosing over and mark on the smooth underside, not the grit surface. This prevents chipping on the visible face. Use a straight edge to ensure a clean, square line.
4. Apply Masking Tape
Run a strip of masking tape along both sides of the cut line. This simple trick reduces fiber release and minimizes splintering during the cut. Fibergrate specifically recommends this technique, and practitioners on forums confirm it makes a noticeable difference. This is one of the most overlooked steps when cutting FRP stair nosing on site.
5. Clamp the Nosing
Secure the nosing to a stable surface, whether that is a sawhorse, a workbench, or the step itself. The L-shaped profile can shift during cutting if not held firmly, and shifting causes chipping and uneven edges.
6. Put On Your PPE
Full PPE goes on before the first cut. Respirator, sealed goggles, gloves, long sleeves, hearing protection. This is not optional. More on why in the safety section below.
7. Cut
With a diamond disc mounted on your angle grinder, cut along the marked line using steady, even pressure. Let the blade do the work. Forcing the cut generates more dust and heat.
If using a circular saw, clamp a straight edge guide parallel to the cut line for accuracy.
8. Smooth the Edge
Use an angle grinder fitted with a coarse grit resin fibre disc, or a metal file, to knock down any rough edges. No edge sealing is required on pultruded FRP nosings after cutting. The resin encapsulation is continuous through the material, so the cut edge is already protected against moisture and delamination.
However, if you are working with a non-pultruded FRP product (like a layup panel), check the manufacturer’s specs. Some FRP products do benefit from edge sealing to prevent moisture intrusion.
Drilling FRP Stair Nosing
Once the nosing is cut to length, you need to drill fixing holes. This is straightforward.
- Standard HSS twist drill bits (the kind you use for wood or metal) work fine for holes up to approximately 12mm.
- For larger holes, use a pilot hole and then a hole saw.
- Carbide-tipped bits are the best choice for volume work. Fiberglass is very abrasive and will dull standard HSS bits over many holes.
- Countersinking is not required.
- Always mark hole locations on the underside of the nosing to prevent chipping on the grit surface.
The fixing method depends on your substrate. Manufacturer guides recommend approximately 8 fixings per metre (about 3 feet 3 inches) of stair nosing on concrete. Typical fastener recommendations by substrate:
- Timber: No. 8 x 30mm zinc or stainless steel screws
- Steel plate: No. 8 x 20mm self-tapping pan head stainless steel screws
- Concrete: No. 8 x 30mm impact anchors
For a dual fixing method (mechanical fasteners plus adhesive), you will also need a caulk gun for construction adhesive. Safety Step Canada supplies stainless steel saddle clamp assemblies for secure mounting on certain profiles.
FRP Dust Safety: The Part Most Guides Skip
This is the most important section in this article. Cutting FRP stair nosing on site generates fine dust containing glass fibers, and that dust is a real health hazard that too many installation guides mention only in passing.
What FRP Dust Does to Your Body
According to a National Library of Medicine report, inhaling FRP dust can irritate the respiratory system. The particles are small enough to reach deep into the lungs.
The skin hazard is equally serious. FRP dust particles can lodge in pores, causing itchiness, rashes, welts, and inflammation. One practitioner in the Festool Owners Group put it bluntly: “The dust from FRP, GRP or other composites is very harmful to the body, and just as bad for electrical components especially motors.”
PPE Checklist
- N95 or P3 respirator. An N95 is the minimum. For extended cutting sessions (multiple nosings in one day), upgrade to a P3-rated half-face respirator.
- Sealed safety goggles. Regular safety glasses leave gaps where fine dust enters. Sealed goggles are necessary.
- Thick work gloves. Protect hands from both the cutting tool and from fiberglass splinters.
- Long sleeves and long pants. Cover all exposed skin. Change clothes and shower after the job.
- Hearing protection. Angle grinders and circular saws produce noise levels that warrant earplugs or earmuffs.
Cutting Environment
- Always cut outdoors or in a well-ventilated area.
- Position a shop vacuum near the cut line to capture dust at the source.
- After cutting, sweep, vacuum, or pressure wash the area thoroughly.
Using sharp blades also helps. A sharp diamond disc produces less dust than a dull or worn blade because it cuts cleaner with less friction. This is another reason to replace metal cutting discs when they start to wear.
Common Mistakes When Cutting FRP Stair Nosing
Knowing the tools needed for cutting FRP stair nosing on site is only half the battle. Avoiding these mistakes will save you time, material, and frustration.
Using a standard wood blade. It dulls almost immediately on fiberglass. The result is a ragged, splintered edge and a ruined blade. Diamond or carbide is non-negotiable.
Cutting indoors without dust extraction. FRP dust settles on everything and gets into HVAC systems, tool motors, and lungs. If you absolutely must cut indoors, use a shop vacuum with a HEPA filter right at the cut point and wear a P3 respirator.
Skipping the dry fit. Every re-cut wastes material and time. Dry fit first, mark second, cut third.
Not clamping the nosing. The L-shaped profile has a tendency to shift or vibrate during cutting. This causes chipping on the grit surface and can produce an angled cut.
Marking on the grit side. The grit surface chips more visibly than the smooth underside. Always mark and initiate cuts from the back face.
Forgetting the 50mm clearance. Walls, weld beads, and expansion joints at the edges of stairs mean the nosing should be shorter than the full step width. About 50mm (2 inches) of total clearance (25mm per side) is standard practice.
For a broader look at installation best practices and pitfalls, the guide to cutting and fitting pultruded FRP nosings covers additional detail.
FRP vs. Other Stair Nosing Materials: Cutting Comparison
One reason contractors choose FRP stair nosings is the ease of on-site cutting compared to alternatives. If you are deciding between materials, here is how they compare for field work.
FRP (pultruded fiberglass): Cuts easily with a diamond disc on a standard angle grinder. No edge sealing required. Lightweight. The same cutting tools needed for FRP stair nosing on site work for anti-slip sheets for platforms and walkways and other pultruded FRP products.
Aluminum: Also cuttable on site with similar tools, though aluminum produces metal shavings rather than glass dust. Different blade teeth are optimal. See the aluminum stair nosing installation guide for specifics.
Rubber treads: Cut with a utility knife or heavy shears. Simpler cutting, but rubber offers less durability outdoors. The FRP vs. rubber stair treads comparison breaks this down further.
Cast metal nosings: Typically require factory fabrication. On-site cutting is impractical.
For most job sites where corrosion resistance, lightweight handling, and field-trimmable profiles matter, FRP wins on practicality.
Limits to Keep in Mind
Anti-slip stair nosings reduce slip risk but do not eliminate all fall hazards. Stairs still need regular cleaning and maintenance. Ice, oil, and debris must be managed separately. If your project has specific building code or accessibility requirements (especially in Canadian public buildings), verify compliance with the applicable standards for your jurisdiction.
The tools and techniques in this guide apply to standard pultruded FRP stair nosing profiles. If you are cutting other FRP products like grating, flat panels, or molded shapes, the blade recommendations are similar, but edge-sealing and structural considerations may differ. Always check the manufacturer’s installation guide for your specific product.
Next Steps
If you are planning a stair nosing installation and want to confirm sizing before ordering, contact Safety Step Canada for help choosing the right length and profile. You can also review completed project examples to see FRP nosings installed across commercial, industrial, and government facilities.
Shop FRP stair tread nosings in multiple widths, lengths, and colors, including glow-in-the-dark options for egress safety.
Frequently Asked Questions
What is the best tool for cutting FRP stair nosing on site?
A 4 to 5 inch angle grinder with a diamond dry-cut disc is the most recommended tool across FRP stair nosing manufacturers. It is portable, fast, and produces the cleanest cuts on pultruded fiberglass profiles.
Can I cut FRP stair nosing with a hacksaw?
Yes, but it is slow and physically demanding. FRP is tough to cut by hand. A hacksaw works for a single emergency cut, but for any real volume of work, a power tool with a diamond or carbide blade is far more practical.
Do I need to seal the edges after cutting FRP stair nosing?
No. Pultruded FRP nosings have resin fully encapsulating the glass fibers throughout the cross-section, so the cut edge is already sealed against moisture. This is a genuine time-saver compared to other composite materials that may require edge treatment.
What kind of drill bit works for FRP stair nosing?
Standard HSS twist drill bits (the type used for wood or metal) work for drilling fixing holes in FRP nosings. For higher-volume jobs, carbide-tipped bits last much longer because fiberglass is extremely abrasive and dulls standard bits quickly.
Is FRP dust dangerous?
Yes. FRP cutting dust contains fine glass fibers that irritate the skin, eyes, and respiratory system. Always wear an N95 or P3 respirator, sealed goggles, gloves, and long clothing. Cut outdoors or in a well-ventilated area, and clean the work area thoroughly afterward.
How much shorter should FRP nosing be than the step width?
Plan for approximately 50mm (2 inches) of total clearance, roughly 25mm on each side. This accounts for wall returns, weld beads, expansion joints, and other obstructions at the edges of the step. Always dry fit before cutting.
Why does my blade dull so fast when cutting FRP?
Fiberglass is highly abrasive. Standard wood or steel blades wear out almost immediately. This is why diamond or carbide blades are essential for cutting FRP stair nosing on site. Diamond discs last the longest and produce the cleanest results.
Can I use the same cutting tools for FRP nosings and FRP grating?
The same blade types (diamond, carbide) and power tools (angle grinder, circular saw, jigsaw) work across pultruded FRP products. The main differences are in clamping setup and cut geometry, since grating has an open mesh structure rather than a solid profile.