
TL;DR
Pultruded FRP stair nosing cuts cleanly on site with standard power tools fitted with diamond-tipped blades. The main hazard is fine glass dust, which irritates lungs, eyes, and skin. Wear an N95 respirator, safety goggles, gloves, and long sleeves. Cut outdoors or with local extraction, support the workpiece firmly, and go slower than you would with wood. Edge sealing is smart in wet or corrosive environments but not always necessary for standard foot-traffic applications.
This guide is for contractors, facility maintenance teams, and property managers who need to trim FRP nosing to fit on a jobsite. It covers every term you’ll encounter, from blade selection to cold-weather adhesive, so you can make clean cuts without sending anyone home itchy or wheezing.
If you’re looking for pultruded FRP nosing you can cut to fit on site, browse the FRP stair tread nosings available in multiple widths, lengths, and colors.
What Is Pultruded FRP?
Pultruded FRP Defined
FRP stands for fibre-reinforced polymer. Pultrusion is the manufacturing process: continuous glass fibres are pulled through a resin bath and then through a heated die, producing a consistent cross-section with uniform density throughout. Think of it as extrusion, but pulling instead of pushing.
Why does this matter for cutting? Because pultruded profiles have no voids, no hollow sections, and no directional weakness that would cause splitting. The material behaves predictably under a saw blade. It won’t delaminate the way hand-laid fiberglass sometimes can, and it weighs roughly a quarter of what steel does. That combination of consistency and light weight is what makes on-site cutting practical rather than risky.
For more on the manufacturing process and chemical resistance properties, visit the frequently asked questions page.
FRP vs. GRP
These terms describe the same material. FRP (fibre-reinforced polymer) is the standard North American term. GRP (glass-reinforced plastic) is the preferred term in the UK, Australia, and New Zealand. If you see either on a product data sheet, you’re looking at the same composite. This article uses FRP throughout.
Grit Surface
The bonded aggregate on top of FRP nosing is what provides slip resistance. It’s an abrasive grit (often aluminum oxide or silicon carbide) embedded in resin on the walking surface. When cutting, the grit surface matters because you should always cut from the grit side downward. This minimizes chipping and delamination on the visible face.
Cutting Tools: What Works and What to Avoid
Choosing the right blade is the single biggest factor in getting a clean cut. Here’s a breakdown by tool.
Diamond-Tipped Blade (Circular Saw)
This is the consensus recommendation across manufacturers and experienced installers. Fibergrate’s Regional Sales Manager Dave Anderson has stated that a diamond-tipped saw blade “is going to give you a cleaner cut with less dust.” Diamond blades last longer than any alternative, produce minimal burring, and require less post-cut cleanup.
The higher upfront cost pays for itself quickly. If you’re cutting more than a few pieces on a project, diamond is the default.
Dry-Cut Diamond Disc (Angle Grinder)
A 100mm (4-inch) angle grinder fitted with a dry-cut diamond disc is the go-to for tight spaces and single-piece trimming. The Barrier Group installation guide (which currently ranks first on Google for this topic) specifically recommends this setup. It’s portable, fits into awkward stairwells, and handles one-off cuts efficiently.
Tungsten Carbide Blade (Jigsaw)
For notch cuts, L-shaped cuts, or working around posts and obstacles, a jigsaw with a tungsten carbide blade is the right tool. You won’t use it for full crosscuts, but it’s essential for fitting nosing around handrail brackets or drain channels.
Hacksaw
A hacksaw with a fine-toothed steel blade works for one or two cuts when power tools aren’t available or practical. It’s slow but adequate. Pultron Composites notes that a tungsten or diamond-gritted blade is preferable, but a standard steel hacksaw blade will get through the material.
What Not to Use
Steel-style shear cutters will crush and delaminate the composite. Standard wood-cutting blades dull within a few cuts, and as they dull, they generate more heat and more dust. Practitioners on the Garage Journal forum confirm that a standard ATB carbide circular saw blade technically works but wears fast. One experienced user noted it “cuts fine” but stressed the importance of not going too fast and wearing proper protection.
FRP vs. Aluminum: Side-by-Side Cutting Comparison
No other guide on this topic puts these two materials next to each other for cutting, so here’s a practical comparison.
| Factor | Pultruded FRP | Aluminum |
|---|---|---|
| Recommended blade | Diamond-tipped | Non-ferrous carbide (TCG) |
| Angle grinder option | Yes, dry diamond disc | Yes, abrasive cut-off wheel |
| Hand tool option | Hacksaw | Hacksaw |
| Dust hazard | High (glass fibre + resin particles) | Moderate (metal filings) |
| Sparks | None | Possible with grinder |
| Cut edge treatment | Optional resin seal | Deburr only |
| Cleanup | HEPA vacuum recommended | Magnetic sweep or vacuum |
If you’re weighing FRP against aluminum for a project, see the detailed comparison in FRP vs. aluminum stair nosing for coastal and corrosive environments.
Cutting Technique: How to Cut Pultruded FRP Nosing on Site Safely
On-site cutting of FRP nosing is standard practice, not a workaround. Contractors do it every day. But technique matters. Here are the rules.
Support the Workpiece
Clamp or support the FRP nosing on both sides of the cut line, as close to the cut as practical. The material is stiff but lightweight, and unsupported sections will vibrate. Vibration causes chipping at the cut edge and can grab the blade. Rigid support prevents both problems and also stops warping during the cut.
Apply Masking Tape to the Cut Line
Wrap a strip of painter’s tape along the cut line on both sides of the nosing. This serves two purposes: it gives you a visible, straight line to follow, and it physically contains glass fibres at the cut edge, reducing splintering. Multiple manufacturer guides recommend this step, and it takes about 15 seconds.
Cut Speed: Slower Than Wood
FRP looks like it should cut at the same speed as lumber, but it shouldn’t. Go slower. Forcing the blade generates heat, and excessive heat softens the bonding resin, producing a ragged rather than a clean edge. Multiple manufacturer guidelines emphasize this. Let the blade do the work. If the saw bogs down or the blade starts to bind, you’re pushing too hard.
Cut Direction
Always cut from the grit-surface side downward. The exit side of the blade is where chipping occurs, so you want the decorative, visible surface on the entry side. This is the same principle as cutting laminate face-up with a circular saw.
Avoid Heat Buildup
If you notice discolouration or smell burning resin, stop. Let the blade and the workpiece cool. On a hot day, or when making multiple consecutive cuts, pause between pieces. Heat is the enemy of a clean FRP cut.
For additional cutting and finishing techniques, the article on on-site cutting and finishing tips covers related scenarios.
Safety and PPE: The Most Important Section
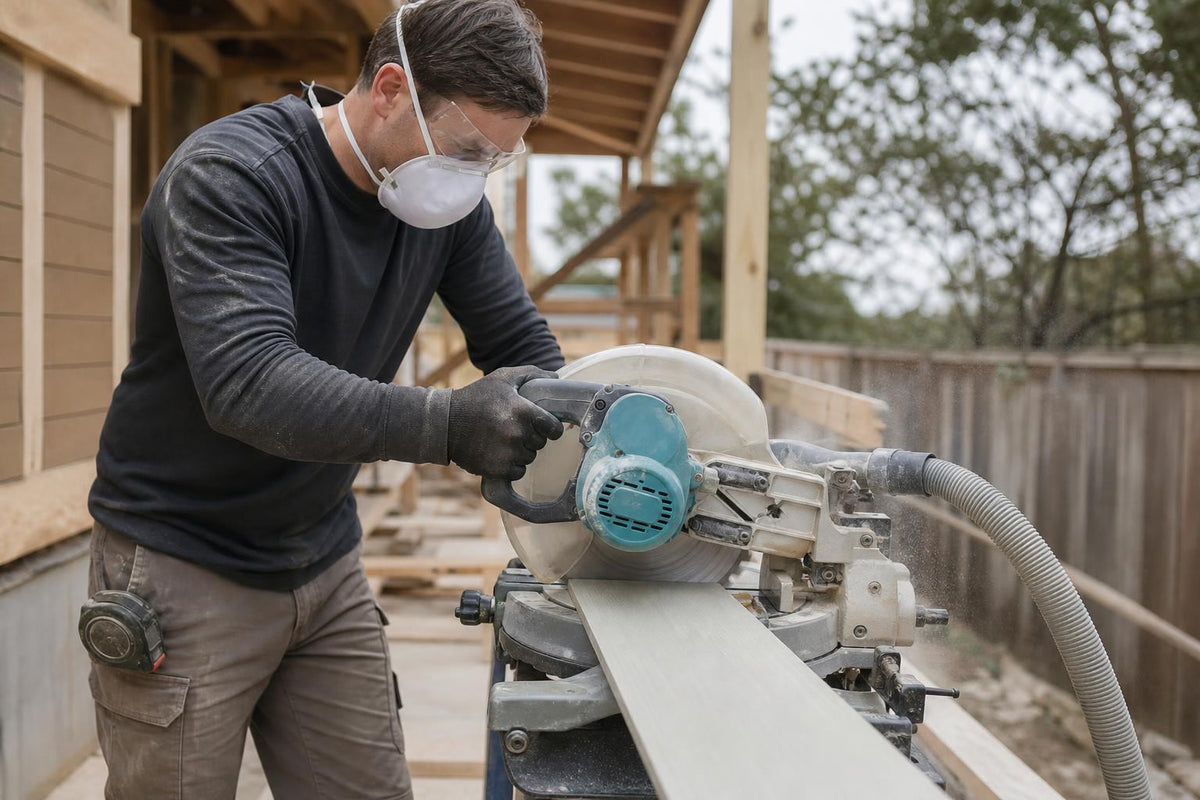
This is where people get hurt. Not from the saw, usually, but from the dust. Cutting pultruded FRP nosing on site safely means managing glass dust above all else.
FRP Dust: What It Is and Why It Matters
When you cut FRP, the blade shreds glass fibres and resin into fine airborne particles. These particles irritate the respiratory tract on inhalation, cause itching and redness on skin contact, and can scratch corneas if they reach your eyes. The irritation isn’t subtle. Forum users describe “the 2-day itchies” after cutting FRP without skin protection. One practitioner on Garage Journal bluntly recommended a “bunny suit” (full disposable coverall) for anyone cutting more than a few pieces, adding, “you don’t want glass dust in your eyes or lungs.”
FRP dust is not classified as a carcinogen by OSHA, but it is a recognized irritant at any exposure level. OSHA’s permissible exposure limit (PEL) for fibrous glass dust is 15 mg/m³ total and 5 mg/m³ respirable as an 8-hour time-weighted average. NIOSH recommends a lower limit of 3 fibres/cm³ for respirable fibres plus 5 mg/m³ total. Air sampling at composite cutting facilities has found typical exposures well below these thresholds, but “below the legal limit” and “comfortable” are two different things.
The bottom line: short-term nosing cutting on site probably won’t exceed regulatory limits, but PPE is still essential because the dust is immediately irritating.
N95 Respirator (Minimum)
An N95 filtering facepiece respirator is the minimum recommended protection for intermittent FRP cutting. It filters at least 95% of airborne particles. For prolonged or repeated cutting (production-scale work), a P100 respirator or a powered air-purifying respirator (PAPR) is more appropriate. Fibergrate specifies a NIOSH/MSHA-approved dust mask with a PEL rating of not less than 0.1 mg/m³.
If you have any existing respiratory condition, Fibergrate’s safety guidance is direct: do not fabricate FRP products.
Safety Goggles
Standard safety glasses are not enough. Fine glass dust gets around the lenses from the sides and top. Sealed safety goggles that sit flush against your face are what you need. This is a detail many generic guides skip.
Long Sleeves and Gloves
Exposed skin will itch. Glass fibres embed in pores and cause irritation that lasts one to two days. Wear long sleeves (ideally a disposable coverall for heavy cutting), work gloves, and tuck sleeves into gloves. This isn’t optional comfort advice; it’s the difference between finishing the job normally and spending the next 48 hours scratching.
Ventilation and Outdoor Cutting
Always cut FRP outdoors when possible. If you must cut indoors, set up local exhaust ventilation directly at the cutting point. General room ventilation alone is not sufficient because the dust settles before it reaches the exhaust.
Experienced practitioners recommend having someone standing by with a shop vac positioned right at the cut to capture dust as it’s generated. Ideally, connect a vacuum directly to the saw’s dust port if your tool has one.
HEPA Vacuum at Source
A portable HEPA vacuum is the best dust control tool for on-site FRP cutting. Connect it to the saw if possible, or position the nozzle within inches of the cut. Standard shop vacs without HEPA filters will pass fine glass particles right through and blow them back into the air.
Cleanup After Cutting
Do not sweep FRP dust with a broom. Sweeping launches settled particles back into the air. Use a HEPA vacuum followed by damp wiping. FRP dust is also slippery on smooth floors, creating a secondary slip hazard if it spreads beyond the cutting area, which is ironic given that you’re installing anti-slip products.
For broader safety context on how stair nosings reduce workplace incidents, see how stair nosings reduce slip incidents.
After the Cut: Edge Sealing, Adhesive, and Fixing
Edge Sealing
Every cut through pultruded FRP exposes bare glass fibre at the new edge. In theory, this exposed fibre can wick moisture into the profile over time, and in wet or chemically aggressive environments, that moisture becomes the starting point for degradation.
Most manufacturers recommend sealing every cut edge with a compatible resin (polyester sealer on polyester FRP, vinyl ester on vinyl ester FRP), applied by brush and allowed to cure before the nosing goes into service. Strongwell’s fabrication manual states to “always touch up or seal any cut surfaces or edges” before considering the job complete.
However, the position isn’t unanimous. Bedford Reinforced Plastics has stated that they “eliminated resin sealing, which has been shown to be unnecessary,” claiming extensive testing proved sealing offers no significant gains in long-term composite performance.
For stair nosing specifically, the practical reality falls somewhere between these positions. The cut ends of nosing typically butt against walls or are covered by adjacent trim, so they’re not continuously exposed to standing water. In standard foot-traffic applications indoors, sealing is optional. In wet environments (pool areas, food processing, exterior stairs exposed to rain and freeze-thaw cycles), sealing is smart insurance that costs almost nothing in time or materials.
The same sealing principles apply when trimming anti-slip sheets for platforms and other FRP products.
Substrate Scuffing
Before bonding nosing to a stair tread, scuff both the underside of the nosing and the stair surface with coarse sandpaper (60-80 grit). This roughens smooth surfaces and gives adhesive something to grip. On concrete, wire-brushing or grinding away paint, sealers, or laitance is necessary for a lasting bond. For a full walkthrough on preparing concrete for FRP nosing, see how to install FRP stair nosing on concrete.
Adhesive Cure Time
Standard construction adhesive used for FRP nosing requires 24 to 48 hours to reach full cure. During this period, foot traffic should be kept off the nosing. In practice, most adhesives develop handling strength within a few hours, but full bond strength takes the full cure window.
Cold-Weather Installation (Canadian-Specific)
This is a detail no competing guide addresses, and it matters enormously for anyone installing FRP nosing in Canada between October and April.
Adhesive performance drops sharply below 5°C (40°F). At those temperatures, curing slows dramatically, and the adhesive may never reach full bond strength. Watco’s installation guide specifically states that in very cold weather, you should use mastic adhesive and supplement with mechanical screws. Another manufacturer warns that installations below 40°F “will most certainly run into unexpected problems with adherence.”
If you’re installing nosing in a Halifax stairwell in November or an Edmonton loading dock in January, plan on combination fixing: adhesive plus screws. The adhesive provides continuous contact and distributes load, while the screws provide immediate mechanical hold during the extended cold-weather cure.
For mechanical fixing options, stainless steel saddle clamp assemblies provide a clean, corrosion-resistant fastening solution for FRP nosing.
Measurement and Fit
Measure Each Step Individually
Steps that look uniform are often not. Even in well-built commercial stairways, individual treads can differ by 3 to 10mm in width. Measure every step separately and mark each piece of nosing for its specific location. Cutting all pieces to one measurement and hoping they fit is a common mistake that wastes material and time.
For detailed measurement guidance, refer to how to measure a stair for correct nosing size.
Nosing Projection (Overhang)
The nosing projection is how far the front lip of the nosing extends past the vertical face of the riser below. This dimension matters for code compliance and for preventing trip hazards. A projection that’s too large creates a lip that catches toes on the way up. Check your local building code for maximum allowable projection before installation.
Dry Fit Before Adhesive
Always position the cut nosing on the stair before applying any adhesive. Verify that the piece sits flat, the projection is consistent across the width, and both ends make proper contact with walls or trim. Adhesive is difficult to reposition once applied, and a dry fit takes 30 seconds.
FRP Nosing Lifespan
Understanding how long the material lasts provides context for why the cutting and installation steps are worth doing properly. Material comparison data shows fiberglass (FRP/GRP) with an expected outdoor lifespan of 20 to 30+ years, compared to 15 to 25 years for aluminum, 5 to 10 years for rubber, and 3 to 7 years for PVC. Individual FRP nosing manufacturers specify design lives of 10 to 15 years depending on traffic analysis, but the material itself can far outlast those conservative figures when installed correctly.
This durability is one reason it’s worth learning how to cut pultruded FRP nosing on site safely and taking the time to seal edges and properly bond the nosing to the substrate. A five-minute shortcut during installation can cost years of service life.
On-Site Cutting Checklist
Use this as a quick reference when you’re standing at the staircase with saw in hand.
Before cutting:
- [ ] Measure each step individually
- [ ] Mark cut lines on masking tape
- [ ] Set up in a well-ventilated area (outdoors preferred)
- [ ] Position HEPA vacuum at cutting point
- [ ] Put on N95 respirator, sealed goggles, gloves, long sleeves
- [ ] Verify diamond or carbide blade is sharp and properly seated
During cutting:
- [ ] Support workpiece on both sides of the cut
- [ ] Cut from grit-surface side downward
- [ ] Feed slower than you would for wood
- [ ] Pause between cuts if heat builds up
After cutting:
- [ ] Dry fit each piece before adhesive
- [ ] Seal cut edges in wet/corrosive environments
- [ ] Clean up all dust with HEPA vacuum and damp wipe
- [ ] Allow 24-48 hours adhesive cure (longer below 5°C)
- [ ] Add mechanical screws in cold-weather installations
Frequently Asked Questions
What blade should I use to cut FRP nosing?
A diamond-tipped blade on a circular saw is the best option for most situations. It produces the cleanest cut with the least dust and lasts significantly longer than carbide alternatives. For tight spaces, use a 100mm dry-cut diamond disc on an angle grinder. For notch cuts, a jigsaw with a tungsten carbide blade works well.
Is FRP dust dangerous?
FRP dust is a recognized respiratory and skin irritant. It contains fine glass fibres and resin particles that can irritate airways, cause eye damage, and produce persistent skin itching. While typical on-site cutting exposure falls below OSHA’s permissible limits, PPE is essential because the dust is immediately uncomfortable and potentially harmful. Always wear an N95 respirator, sealed goggles, gloves, and long sleeves.
Can I cut FRP nosing with a hacksaw?
Yes. A hacksaw with a fine-toothed blade will cut through pultruded FRP nosing. It’s slow compared to a power saw, but it works for one or two cuts when power tools aren’t available. A tungsten or diamond-gritted hacksaw blade gives a cleaner result than a standard steel blade.
Do I need to seal the cut edge of FRP nosing?
It depends on the environment. In standard indoor foot-traffic applications where the cut ends butt against walls, sealing is optional. In wet, outdoor, or chemically aggressive environments, sealing with a compatible resin (polyester or vinyl ester, matching the nosing’s resin type) prevents moisture wicking and extends service life. When in doubt, seal. It takes minutes and costs almost nothing.
Can I install FRP nosing in cold weather?
Yes, but with modifications. Below 5°C (40°F), adhesive curing slows significantly and may not reach full bond strength. Supplement adhesive with mechanical screws and extend the no-traffic cure period to at least 48 hours. Use mastic adhesive rather than standard cartridge adhesive in very cold conditions.
How far apart should screws be for FRP nosing?
Most manufacturers recommend screws every 300mm (12 inches) along the length, with additional screws at each end. In cold-weather installations or high-vibration environments, tighten spacing to 200mm (8 inches). Pre-drill pilot holes to avoid cracking the composite, and use stainless steel or other corrosion-resistant fasteners.
Not sure which FRP nosing size, profile, or color fits your project? Contact Safety Step Canada for help choosing the right product and quantity.